How To Install A Solar Junction Box?
Junction Box: Electrical Performance and Considerations
1. Electrical Performance:
The electrical performance of a junction box is crucial, primarily determined by parameters like working voltage, working current, and resistance. These parameters are essential to assess the qualification of a junction box.
2. Working Voltage:
The working voltage is pivotal, and when a reverse voltage reaches a certain level, it can cause breakdowns, losing unidirectional conductivity. For instance, the IN4001 diode has a reverse withstand voltage of 50V, while the IN4007’s is 1000V. The junction box’s working voltage is currently standardized at 1000V (DC).
3. Junction Temperature Current:
This is the maximum forward current value allowed for continuous long-term operation. It’s crucial as exceeding the rated forward working current value can lead to overheating and damage. The higher the junction temperature current, the more extensive the operating range of the junction box. It can reach up to 16A, and for smaller component junction boxes, it must reach 9A.
4. Connection Resistance:
Connection resistance reflects the connection quality between the terminal and the busbar. It doesn’t have a precise range requirement. There are two connection methods: clamping and welding, each with its pros and cons. Clamping is quick and easy but may result in high contact resistance, while welding offers a tight connection but can damage the diode due to high soldering temperatures.
5. Welding Strip Width:
This refers to the width of the component’s lead wire and the bus strip, including the spacing between the welding strips. It comes in three specifications: 2.5mm, 4mm, and 6mm, considering busbar resistance and spacing.
6. Operating Temperature:
The junction box, working in tandem with the components, needs to adapt to various environments. The current standard for operating temperature is -40℃ to 85℃.
7. Junction Temperature:
The diode’s junction temperature impacts the leakage current in its off state, doubling the leakage current for every ten-degree increase in temperature. Thus, the rated junction temperature of the diode should be higher than the actual junction temperature to avoid overheating and damage.
Turn the solar panel over and position the junction box precisely over the designated holes.
It’s highly recommended to opt for junction boxes that come with pre-installed wires and leads, ensuring ease of installation and optimal functionality.
The majority of junction boxes are designed to facilitate the smooth sliding of bus wires from the solar panel into the slots of the junction box. Once the bus wire is properly inserted, it is advisable to solder it securely to the leads within the junction box.
The fundamental concept of connecting and mounting junction boxes is consistent across all models when integrating them with a solar panel. The provided information offers a generalized overview of the installation process, considering the diverse designs and models of junction boxes available. The specific design and model of the junction box you have may necessitate different installation steps. For assistance with a particular junction box or any related inquiries, reaching out to the supplier is highly recommended as they can provide precise guidance and answers to your questions.
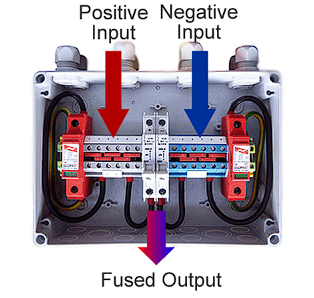
After establishing connections of the positive and negative busses to the junction box, employ a reliable multimeter to ensure the wires are correctly connected to the junction box leads, verifying the accurate voltage reception.
Ensure the junction box adeptly conceals the dual holes in the frame.
Subsequently, locate an appropriate area within the junction box—typically, two central holes are drilled—to pre-drill and affix the junction box securely to the frame using screws. The junction box must exhibit sufficient stability on the frame.
The positioning of the positive and negative busses within the junction box should be distinctly discernible. This procedure may exhibit variations, contingent on the specific junction box acquired, necessitating meticulous attention to ensure proper terminal connections.
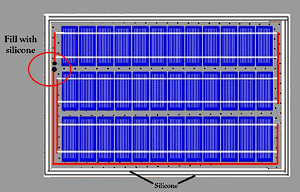
Apply silicone beads around the junction box’s base to align seamlessly with the frame.
Once the bus is interconnected and the silicone at the frame’s base has solidified, position the cover on the junction box and secure it with screws.
Finally, invert the entire solar panel, expose it to sunlight, and assess the voltage output. At this juncture, your solar panel should be fully assembled, operational, and ready for utilization.